Blogg om det som fenger oss, sportsfiske, båtelektronikk, småbåter og andre artige ting som måtte dukke opp.
Søk i denne bloggen
The perfect settings for Lowrance? A guide on how to set up your 2D-sonar part II.
"What are the best settings?" The bad news is that there is no uniform answer to that, the good news is that you can easily adjust settings according to conditions if you have a little bit of knowledge as to what settings you should tweak.
This is part two of our series of three articles covering all the 2D-settings possible for units from Lowrance.
Good sonar - and a user who knows have to use it, will give more fish in the boat.
In the first part (LINK) we covered some crucial points on mounting your unit and transducer, and the basic settings as they appear in the menu you see to the right in your unit:
Tap on this to open the side-bar menu.
In this second article we will continue to list all the settings as they appear on Lowrance HDS Live and Elite FS for 2D-sonar under the Advanced-tab. As in the first article, we will tell you what each setting does and give some advice on how to adjust or use it according to conditions. The exact location of these settings in the menu will vary slightly if your unit is older, but they will still be there on all generations HDS as well as on Elite Ti/ Ti2. On the low-end units like Hook2 and Hook Reveal, you will have to activate the "Advanced" options to see any such settings. (The basic settings where covered in part I, which I highly recommend reading before proceeding with this article.) Now we move on to the Advanced settings, found here in your menu:
Menu-Advanced
Advanced
As the name implies, these are more advanced settings, but luckily advanced does not mean "complicated". As with all other settings we just need to know the basics of what they do to use them properly. These are our options:
Advanced settings.
The first two here are filters, Noise and Surface. The first is a general filter that has effect on everything you see on your screen, while the surface clarity mostly effects the upper 30-ish percent of the watercoloumn. As a general rule of thumb, your general noisefilter should be off, and the surfacefilter should be off or low. If you get noise on your screen, it is much better to find the cause of that noise and solve it, rather than cranking up the filtering. There is always a cause when you have issues with noise/ interference, it does not just happen randomly. (We have an article on that as well, but so far only in Norwegian. You can use Google Translate on it though, you`ll find that article HERE.)
The reason for this is that these filters are not really filters, they are "re-painters". The way the noise rejection works (on all brands, not just Lowrance) is that it identifies the pixels it thinks is noise, and then paints over the noise with the color in the surrounding pixels. In other words, the filtering does not remove interference, it simply covers it with something else. Your sonar has no idea what is really behind the interference, if it did it would remove the interference-echo and show you what is really there and you would never see the interference at all. This leads us to the problem with all such filtering, by increasing it you might make your sonar look good but you also miss out on information. Think of it as covering a dirty floor with a clean carpet, the dirt is still there under the carpet.
Noise Rejection
All brands of sonar has this setting, and it does more or less the same on all of them. As mentioned, the "filter" is not really a filter for removing interference, it just hides it from your eyes.
Noise rejection levels.
The default setting for most anglers should be "Off", but there are exceptions. If you fish shallow and in an area with a lot of traffic, the turbulence caused by the propellers on other boats can cause so much clutter on your screen that it is impossible to identify even large fish without increasing the filter.
Another example is when there is a lot of debris in the water, like in this screenshot.
Debris from spring-flooding (melting snow).
When fishing in areas with a strong current (river or tidal), there can be so much debris in the water (leaves etc) that it gets hard to separate the debris from fish. In such cases increasing the general noisefilter is a good idea.
A third example is when there is a lot of plankton in the water like in this screenshot:
Baitfish and DENSE plankton towards bottom.
The screenshot above was taken in a nutrient-rich lake late in the summer. Lots of nutrients in the water feeds plants, algae and plankton, and generally the amount of plankton increases through the summer. In some lakes the plankton can get so dense it is almost impossible to see anything else on your sonar, and in such conditions filtering can help you out. Large fish (typically the predatory fish we as anglers hunt for) will still be seen with the filtering up to Medium, even with the fish on the outskirts of the coneangle. But if you continue on to High, even large fish on the outskirts of the coneangle will not be shown, only large fish towards the center of the cone will be visible.
If you run your filter to high, you will miss out on plankton and the thermocline. As both of these can be crucial for knowing you are fishing in the right spot or depth, we will look at these two specifically below.
Plankton is common both in lakes and in the ocean, and often misinterpreted as a thermocline when looking at the 2D-sonar. Both plankton and thermoclines can move up or down in the watercoloumn during a day (and night), but plankton will always follow a specific pattern. It rizes towards the surface during the evening and ends up at surface-level during the night, before it starts to work its way down again in the morning. Plankton simply follows the light.
Plankton follows the light.
A thermocline is a transition layer between warmer and cooler water. Such transitions are found everywhere where it is deep enough to use a boat, simply because the sun heats the surface-layer faster then the rest of the watercoloumn. As you might remember from school, the weight of water varies with temperature, water is most dense (thus most heavy) at 4 degrees Celsius/ 39,2 Fahrenheit.
1 strong thermocline, and two weaker thermoclines.
Since the ping from our transducer is influenced by density (the reason you see a fish at all is because it has higher density than the surrounding water) you can see a thermocline on your sonar.
A thermocline will be a faint line on 2D sonar.
In some lakes (not all) this layering is so stable that the dense water towards bottom hardly circulates at all. In such cases the cooler water towards bottom will at some point decrease its oxygen-level since there is little algae, plankton or plants producing oxygen there but still debris sinking and rotting that consumes oxygen in its process of decay. This leads to the watercoloumn below the thermocline becoming so oxygen-deprived that fish can not live there. When fishing such lakes, knowing where the thermocline is, is crucial as it will tell you how deep you can fish and still catch fish. Since there is no fish below the thermocline, there is little point in fishing deeper than the thermocline....
Thermocline in shallow water.
In other lakes (especially here in Scandinavia) the fish tend to stay below the thermocline, the exact opposite of what is the case in lakes in the southern hemisphere. Here in Scandinavia the summers are short, so the oxygen-reduction happening below the thermocline rarely becomes a problem. As you can see from the screenshot of a thermocline above, in my case the fish are all hanging out below the thermocline.
This leads to some very interesting discussions in Facebookgroups where many nationalities meet, as some will be claim everything below the thermocline is dead, while others will claim that you should fish below the thermocline. Both are correct, it depends on local conditions. In other words, your sonar can provide vital information to you if adjusted properly, but having the knowledge to use that information versus local conditions is up to us as anglers.
In order to see a thermocline at all, your filtering has to be off, and the sensitivity set high enough for the sonar to show the faint return of the thermocline.
Surface clarity
Surface clarity works slightly different to noise rejection. It does the same as in regards to filtering, but with a significant twist. This filtering only applies to the top 30 percent (ish) of the watercoloumn. Increasing the filtering from off to low is often needed when in waves or in areas with a lot of other boats (as their propellers cause turbulence), or when trolling fast (as your hull creates turbulence) but be careful when increasing it more - you will loose targets close to the transducer.
Surface clarity levels.
In this screenshot I switch from having the surfacefilter low, to off and then high.
Surfacefilter.
As you can see changing the surfacefilter has no effect on how all the fish from 12-ish meters and deeper are presented, it only changes the top third of the watercoloum. The surfacefilter should be used with caution when looking for pelagic species, but if the fish you are hunting for typically stays in the lower two thirds of the watercoulmn the surfacefilter can be handy, especially since you can increase both the surfacefilter AND sensetivity and thus end up decreasing the information you don`t need (what is close to the surface) wile seeing more of the things you need to see (the fish closer to bottom).
If you come from Garmin or Simrad, you might miss a setting called TVG - Time Variable Gain. That setting is not there on Lowrance. TVG on Lowrance is the surface clarity filter, as it does the same. Increasing this filter has the same effect as increasing TVG on other brands, you just have to increase sensitivity when increasing the surface filter. As with TVG, use this with caution if you are looking for shallow targets, or if you are looking for pelagic targets over deep water.
Scroll speed
As you probably know by now, the image in your 2D-view scrolls from right to left. What you see on the right side of your screen is what you just passed over, what you see towards the left side of your screen was passed over some time ago. That "some time" is adjusted with scrollspeed. I you want information on what is under your transducer right now, you use A-scope and not the history. (A-scope is found under Menu-More options, which we will cover in the next article.)
Scrollspeed is important when the boat is moving, in order for the sonar to "paint" a picture for you that gives you as accurate information on what is below your boat as possible. Scrollspeed should match the speed of the boat in order to get as "correct" returns drawn on the sonar as possible. Correct, as in displayed in a way that helps you understand what is down there. To fast and whatever you see will be stretched out, to slow and whatever you see will be compressed.
The default setting for scrollspeed changes with fishing mode (described earlier in this article). In both General and Shallow water, it defaults to "Normal". Normal is actually quite fast, especially for us fishing in Scandinavia where we seldom troll faster than 3 knots. In the screenshots below I`m only going 1,5 knots (1,7mph), look at how different the returns of the small baitfish looks when changing the scrollspeed.
In the first shot I`m using "Normal" scrollspeed, and you can easily see that the tiny baitfish smear out, even when I`m using fairly low sensitivity (auto -5 in all screenshots below):
Scrollspeed Normal and low speed of the vessel = smear.
In the next screenshot I have reduced scrollspeed two steps about halfway through the scrolling, and you can see that this clears up the smear and I start to see the individual fish:
Reducing scrollspeed to match the speed of the vessel = better separation of the single fish.
Reducing scrollspeed even further and we see that what looked as one huge school of fish with normal scroll, is actually several individual schools:
Finally - good match of scroll and speed of the wessel.
In my screenshot below, I`m still going slow, but now I have beefed up scrollspeed (doing the exact opposite of what I should have done). By now I have moved away from the most dense schools, and only have a few baitfish within the coneangle of my HST-WSBL. But the fast scrollspeed could easily have given me the impression that the fish below my transducer are big. (They are not, these fish are smaller than my palm, and not that many either.)
Way to fast scroll - fish appear much larger then they really should.
Still not convinced of the importance of scrollspeed? Let us take a quick look at this northern pike I caught this summer.
Correct scroll.
Then we look at the same photo again, but this time using 50% to fast scroll, stretching the image:
Ouch, no more sweets for me.
So now you know that to fast scroll can make you think small fish are big, and that few fish are many. But do you think you will be able to make out a big fish among small with to fast scroll? The answer to that is no. The smear made by small baitfish on your screen, would make it very hard to identify if there are a larger fish there as well.
When scrollspeed is correct, you can identify larger fish in between schools of baitfish.
In the screenshot above I`m trolling using a downrigger. The horizontal lines you see across the screen are made by my downrigger-weight, the clip that holds my line and the snubber on the weight. As you see there are a few good baitballs, and the arrows point to larger predatory fish preying on that bait. If my scrollspeed had been to high, I would never have seen those larger fish. But since I did see them, I took another run over the same spot and that paid off. Here is another example:
Scrollspeed is key to the separation needed to identify larger fish.
From my point of view, scrollspeed is perhaps one of the most misunderstood settings. Many users use way to fast scroll, thinking it gives them a more updated sonar-image. Stop thinking that the sonar-image is updated, for updated information you should rely on A-scope. (A-scope is found under "more options", and will be covered in our third article in this series.) Do that, and it becomes easier to adjust scrollspeed. Scrollspeed is not about updated images, it is about showing sonar-history correct.
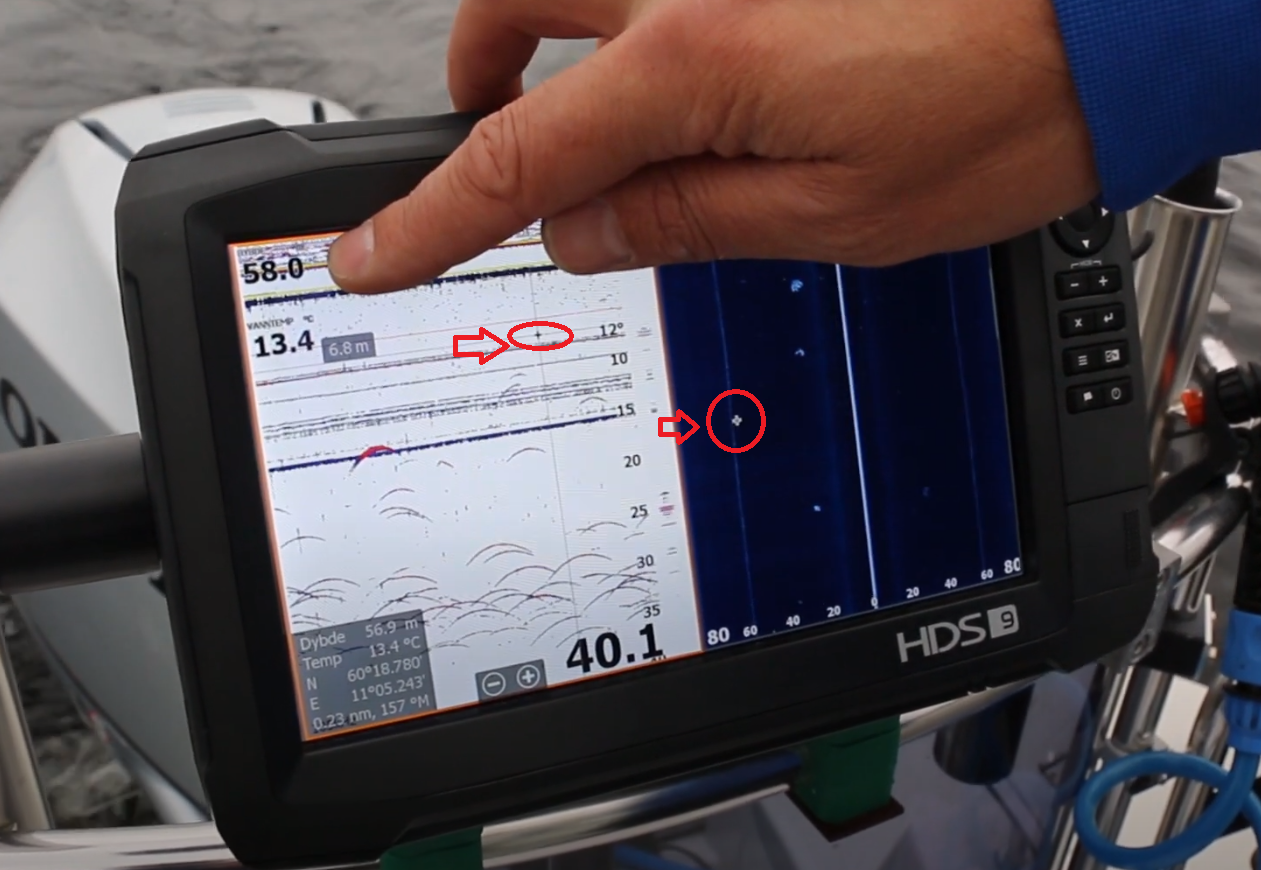
A little tip from me for better understanding how far behind the boat something you saw on 2D-sonar really was, is to use splittscreen with 2D and chart. Then put your finger on the 2D-side of the screen and scroll backwards in the sonar history. You will see a small cross on the trail behind your boat-icon on your chart when you do this, that cross tells you where that echo was recorded by your sonar. (You can easily add a waypoint this way as well, if you see something you want to mark.)
Scroll on 2D versus chart.
The cursor on 2D also shows up on the map.
You can do the same for understanding how far back something was/ is on SideScan, and to understand scrollspeed on 2D versus SideScan. Here we put a marker on the 2D-side and you see the same marker on SideScan:
Scroll on 2D versus SideScan.
Scrollspeed can be adjusted in 16 steps. "Normal" is default and typically good for 4-5 knots. Here is a rough guide to scrollspeed versus the speed of your boat for some of the steps:
x8 - For use while on plane
Normal - For fast idling boats doing 4-5 knots
x1/2 - For 2-3 knots
x1/5 - For slowtrolling around 1-1,5 knots
x1/9 - Anchored (should always be used with A-scope on as well)
Scrollspeed should bee seen in combination with pingspeed. For this reason, many budget-units combine scroll and ping into one setting. If you lower scroll, you also lower ping and vice versa. More on this when we look at the next point in the advanced menu:
Ping speed
The acoustic signal sent by the transducer is called a ping. You might think that "pingspeed" has something to do with how fast that ping travels through the water, and if you do you are dead on but perhaps not in the way you might assume.
Sound travels through water at 1497 meters per second (freshwater at 25 degrees Celsius) or 4911 feet per second. So if the depth where you fish is 749 meters, the ping will use one second from leaving the transducer until the return-echo from the bottom hits the transducer again. If the transducer fires another ping within the same time-interval, you will get a form of crosstalk where the soundwaves "crashes" and causes noise on your screen. The same principle happens when you use your sonar on your boat, and another boat close by use theirs, the sonar ends up having problems with sorting out which return-ping (echo) to process.
The ping speed setting adjusts how often a ping is sent. Ping, ping speed or pingrate tells you something about how often the sonar sends its electrical pulse to the transducer, which again leads to the acoustic signal (the ping) being sent from the transducer.
Your main reason to adjust ping is changes in depth. As the depth increases, running high ping leads to interference, typically seen as vertical lines on your sonar. The signal sent "crashes" with the return of the previous signal if the ping is set to high. (The ping does not just go transducer-bottom-transducer, it might bounce back and forth several times depending on depth and power used.) Typically you set the ping to max, and adjust down as pingnoise (the vertical lines) are shown.
Pingnoise on Elite FS using Airmar TM185HW
Reducing ping also helps the processor in your sonar, since it gets less returns to work with. For this reason alone I seldom use max ping, even in shallow water. But the effect of this will vary between brands, models, generations etc.
Another example of pingnoise.
Another reason to adjust ping, is if you are using two transducers at the same time, and experience crosstalk. By increasing ping on one, and decreasing it on the other, you can reduce crosstalk and in some cases have two transducers transmitting on the same frequency without crosstalk. A little trick I often use myself in order to use 200 kHz with both the transducer in my TM (Trolling Motor) and the transducer I have at the back transom mounted when we are two persons fishing from my boat.
Ping should typically be matched with scrollspeed. (Scrollspeed = how fast the sonarimage "scrolls" on your screen, covered earlier in this article). There is simply no point in setting max ping, if you use slow scrollspeed, unless you are fishing vertically and depending on the A-scope.
Pingspeed when icefishing?
The theory we just went through applies to icefishing as well. But when icefishing you can come across pingnoise (interference) even though you follow the typical "rules" regarding depth and get ping-noise in shallow water. This is especially prone to happen if the bottom is hard and the ice is clear (little or no airbubles in the ice), as this means the ping will bounce back and forth between bottom and the ice. Here is one example where I`m hooking a fish in a mess of ping-noise:
Ping-noise when icefishing.
In such conditions one might have to lower the pingspeed significantly to get rid of the noise.
Can you outrun the ping?
While on the subject of pingspeed, let`s debunk a modern myth. From time to time I see people claiming that the reason that their sonar can not read depth while on-plane, is that they outrun the ping. This claim has no basis in reality. Sound travels at 4911’/sec in water. Even the fastest bassboats out there only travel around 100’/sec. There is no way for a boat to outrun the ping from the transducer, unless your are in some seriously deep water (hundreds of meters, thousands of feet). The real reason why you loose depth while on plane, is to much turbulence (air bubbles) hitting the transducer, and that is typically about mounting and adjusting the transducer itself properly.
What if ping and scroll is one combined setting?
They are not on HDS and Elite Ti/Ti2/FS, but on several older units, and on units in the lower end of the pricerange. On units like Elite HDI, Elite CHIRP and Hook, ping and scroll is combined in one setting - they can not be adjusted individually. This is done to simplify the settings for the user. There is simply no point in using max ping in combination with slow scroll, since the slow scroll never allows the unit to "draw" all the potential detail covered by max ping. The exception is when using A-scope, especially when fishing vertically, where you might have slow to normal scrollspeed but still use high ping as you mostly look at the A-scope anyway and the A-scope captures all the data from high ping. The theory behind the setting(s), as explained above, still stands though. Generally you reduce if you go into deeper water and/ or go at slow speed, increase if you are in shallow water and/ or go fast.
Manual mode
The last option under the Advanced tab is manual mode. We partially described what this does in part one, so if you have already read that, there will be some repetition. Manual mode under Advanced is closely interlinked with the Range-setting in the general menu, so if you are unsure about how that setting works I would suggest going back to the first article and read up on that setting.
When the tab is green (active), you unit will automatically adjust the power in each ping according to depth. Or, as we saw in the first article - not really depth but the distance from the transducer to bottom. But to keep it simple we will refer to it as depth. This means that the power used, will vary automatically. Increasing when it gets deeper, decreasing in shallow water, in order for the unit to have good bottom-lock. For most users, this is how you want to keep it (in Auto), and let the unit control this automatically for you. You can still adjust sensitivity, but the pulse-length and depth used by the unit is controlled automatically.
But there are occasions where you want to override the auto-function. I`ll mention the three most common occasions here.
When looking for specific bottom composition, typically looking for hard bottom in areas with mostly soft bottom. The best way to tell the hardness of the bottom, is to increase the range to around 3 or 4 times actual depth, and look for the double and triple bottom. In some cases you can see four and five as well, if the bottom is rock hard. Soft bottom will not give you an image like this:
Hard bottom
When looking for bottom composition, make sure to use fixed frequency and the frequency that provides the most narrow coneangle (typically 200 kHz with a Lowrance transducer).
When looking for pelagic targets (fish) over deep water. Typically something you do when trolling or fishing vertically. In this screenshot I`m trolling and the depth is close to 100 meters (300 feet). Note all the (bait-)fish you see.
Trolling over deep water.
Even with the depth-range on automatic like in the screenshot above, there is no doubt what so ever that I`m in an area with a lot of fish. But with a little tweaking of my settings, I can get a much better view. If I set the depth-range to the range in which I`m most interested in, AND enable manual mode (Menu-Advanced-Manual mode) the unit will limit the pulse-length of each ping (the power in each ping) to the range I set as well as only showing me what is within the range I set.
Drastic increase in resolution
The result is a drastic increase in resolution. The shorter pulse-length gives better resolution in the sonar-signal itself and the range set gives me more screen-relestate (and pixels) for the stuff I really want to look at. If we compare the two side by side, you can see the difference.
Auto on the left - manual mode on the right.
When the automatic functionality fails. This will typically happen when in very deep water if you are not using a transducer (or unit) suited for such depths, in areas with dense vegetation, or in very shallow water. In such conditions the algorithms simply fail. The unit does not "understand" what the actual depth is. It might go into a cycle where it constantly changes power in the signal in order to establish bottom lock, or show a thermocline or large school of baitfish as the bottom. In such cases, manual mode and depth set to what you know the actual depth is (or slightly more) will usually fix the problem.
Manual mode and dense vegetation.
In the screenshot above there is dense vegetation, and before I turned on manual mode my Elite FS would default to the top of the vegetation as depth. By using manual mode and setting depth slightly deeper than actual depth, I can tell where the bottom is and the unit even ends up showing correct digital depth (in the top left corner).
In the screenshot below I`m testing a Lowrance Hook2 (7) with its stock SplitShot transducer. As you can see to the left the units algorithms are way off, thinking it is in 1,8 feet of water when it is in 500 feet. But I could still get the unit to draw a (faint) bottom line by using manual mode.
Hook2 with SplitShot-transducer in manual mode.
If you had the patience to read this far, you should now have a basic understanding of the advanced set of 2D-settings. The next thing to do, is to get out there on the water and play with these settings. As I mentioned at the very beginning in this article, one of the things that you use settings to compensate for are local conditions. Since it is impossible to cover all the possible "local condition" you might encounter as an angler in one article like this, you simply have to get out there. But that is why we fish, is it not?
More options
In our next article in this series we will look at the options under "More options". Most of these does not change the ping itself, they only change how it looks on your screen.
What if you messed up?
Don`t worry. There are three ways to undo everything we have looked at and adjusted while going through the menu(s) in this article. Those three ways are to "Restore Defaults", do a soft reset, and if all else fails, to do a hard reset. Please keep in mind that neither of these options will hurt your unit, and they can all be used at your leisure whenever you find the need to undo what you (or perhaps a buddy fishing from your boat?) did. We start with the "softest" approach, the Restore Defaults.
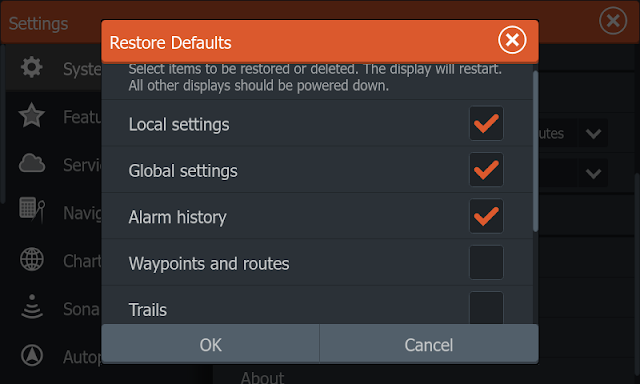
Press Pages, then Settings and System. Scroll down a bit and you will see "Restore defaults...."
Press Pages, then Settings-System-Restore defaults...
Hit it and you get a menu where you tick off what you want to reset, the default options are the typical ones when it comes to settings being out of order:
Typical settings to reset.
Hit OK, and you can start over from the factory settings, you still have your waypoints, routes and trails available in the unit.
The next method is a soft reset. This basically does the same as the previous option, but since you do this by just using the buttons, it is a handy alternative if (for some reason) you have issues with the touchscreen. Like the hard reset, this is not found in the menu, but requires you to do the following:
turn unit OFF
press and hold the PAGES button
press and release the LIGHT/POWER button
release all buttons when the USA map appears
The last step is a hard reset. The hard reset undoes everything you have done, except software-updates. It basically resets the unit back to where it was when you bought it brand new, but still with updated software. The steps for a hard reset are:
turn unit OFF
press and hold both the ZIN and ZOUT buttons
press and release the LIGHT/POWER button
release all buttons when the USA map appears
Please ensure that you back up your waypoints (and if you need them, trails or routes) before doing a hard reset, as this reset deletes them all. Her is a video showing you how to do a hard reset:
I highly recommend that you save your waypoints to a memorycard on a regular basis as back-up.
Want more on the topic while you wait for part III?
The first article in this series of three is found HERE. A guide on mounting your units and what wiring to use for them can be found HERE.
Doctor Sonar educational articles As you will see when looking at the screenshots in the link and comparing them to my screenshots, the good Doc and I disagree on how high sensitivity should be. But that is more about personal preference then knowing what you are doing.
YouTube is a good source for information on settings. But it can also be a bit confusing at times, since YouTube has no quality-control. Anyone can make a "settings-explained"-video and post it on YouTube, and in all honesty a few of these are made by people who mean well but lack knowledge. This video is a good example of a person who really knows what he is doing on a Lowrance:
I believe there is a small mistake in the scroll speed section: "The vertical lines you see across the screen are made by my downrigger-weight", I assume you are referring to the horizontal lines?
Perhaps the most repeated question in Facebookgroups and forums regarding marine electronics: "What are the best settings?" The bad news is that there is no uniform answer to that. The good news is that you can adjust settings according to conditions if you have a little knowledge as to what settings you should tweak and why. Here is part 1 of our guide to get the most out of your unit in regards to settings.
Here we go again, a new generation of the Lowrance HDS. And with that Facebook and the different forums are flooded with questions referring to the difference between the new and the old. So what is the difference between Lowrance HDS Live and HDS Carbon?
You have to hand it to Lowrance when it comes to the name of their new entry-level line of sonar and chartplotters. We all want to hook up, and what better way to do that then by having our marine electronics reveal to us where the fish are?
There are several lists and posts on what transducers are compatible with which Lowrance units, but since I don`t like any of them and tend to like doing things myself, I made a list.
When Lowrance launches a new mid-range unit, it is a big deal. Forums and Facebookgroups light up with questions on the new stuff, differences towards the old stuff and questions on compatibility. As usual, we in Team Colibri will try our best to sort that out, both on a technical level and with a more practical in-your-boat approach.


Very nice article.
SvarSlettI believe there is a small mistake in the scroll speed section:
"The vertical lines you see across the screen are made by my downrigger-weight", I assume you are referring to the horizontal lines?
Thanks you, and thanks for pointing out my mistake. Corrected now. Kind regards Erik
Slett