Gå til hovedinnhold

Examples on how to read SideScan


Over the last week we have posted a few "SideScan-explained" photos on our Facebookpage. Here we sum up those.

Scanning sonar is sonar that uses a narrow coneangle (more like a beam than a cone) and higher frequencies than what we typically use for 2D (the "normal" sonar). In the world of Lowrance, such sonar is called "StructureScan", which typically covers both Side- and DownScan. In the photo below you see what SideScan covers, versus 2D and DownScan.

Different types of sonar "cover" different areas.

So SideScan looks directly out to both sides of the boat, as well as down. If you see something on SideScan, and wonder where that something is in relation to your map, you simply put your finger on it to create a temporary marker, which will also pop up on your map. Like we do in the photo below for 2D:

Using a marker to see where the fish was.

So let us look at a few examples from SideScan, and explain what we see in those screenshots. Equipment used is Lowrance HDS Live (9) and StructureScan 3D. Click on the screenshots if you want to enlarge them.
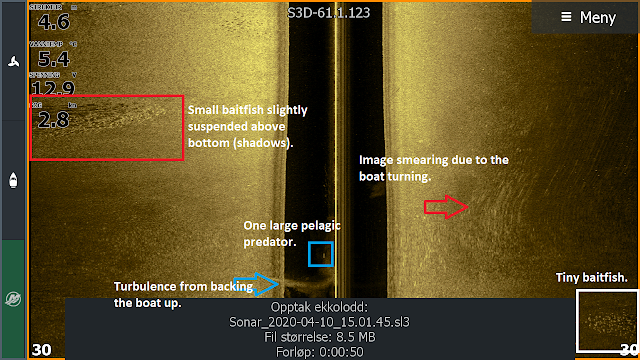
Both small and large fish.

Baitfish and structure.

Turbulence

One thing SideScan is very good at, is showing transitions. Examples of such transitions can be structure like rocks, a wreck or soft versus hard bottom composition, but it can also be depth as in a ledger or drop-off. In the screenshot below (Simrad NSS Evo2 with LSS-2 in saltwater) you see patches of hard bottom in between softer bottom:

Patches of hard bottom.

As you will probably agree on, the screenshots above are all fairly good. Below we will take a look at a few screenshots which are not good, and explain why. Good StructureScan is mostly about mounting and adjusting the transducer, if you mess that up there are no settings in the world that will cure the root-cause, and it does not matter what the price tag was on your equipment. You simply have to get this right, if you want those marketing-clear images.

The first screenshot shows how my SideScan looked after I mounted the transducer and went on the first test-run with it:
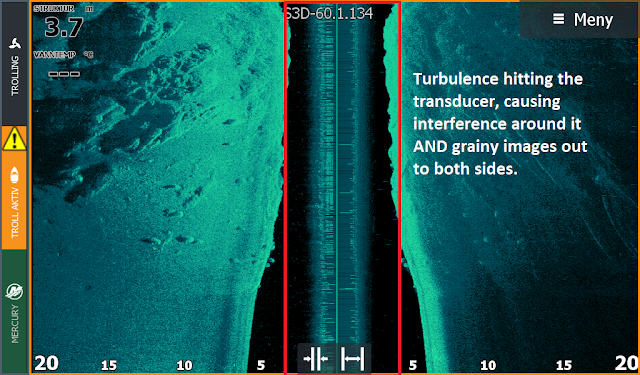
Incorrect height of the transducer causing turbulence.

As you can see, the middle of the image is full of interference, making the center-line several meters thick. This was caused by my transducer being mounted 2 millimetres to low. Once I raised it, my middle line went back to normal. 2 mm is very little, and a way smaller margin versus what one can guesstimate when mounting the transducer the first time. But it goes to show how small the margin of error is when it comes to mounting transducers, one has to mount as best and possible - then go out and test and adjust accordingly based on your test. 

The next screenshot is not mine, but here you see a set of extra lines to the left of the middle-line:

Ghostlines caused by reflections of the signal.

Such lines are called "ghostlines", and have two potential sources. The first is a defect in the transducer itself. This is rare, and caused by an error in the cast in the transducer. (In which case the transducer has to be replaced.) The second source, and way more common, is that there is something partially blocking the signal (ping) from the transducer. Typical examples of this would be the lower housing on the outboard, a jackplate, another transducer, anchor poles or trim tabs. 

If you found this article interesting, the series we have on 2D might be worth a read as well: The perfect settings for Lowrance 2D.

Kommentarer

Populære innlegg

The perfect settings for Lowrance? A guide on how to set up your 2D-sonar part I.

Perhaps the most repeated question in Facebookgroups and forums regarding marine electronics: "What are the best settings?" The bad news is that there is no uniform answer to that. The good news is that you can adjust settings according to conditions if you have a little knowledge as to what settings you should tweak and why. Here is part 1 of our guide to get the most out of your unit in regards to settings.

What is the difference between HDS Carbon and HDS Live?

Here we go again, a new generation of the Lowrance HDS. And with that Facebook and the different forums are flooded with questions referring to the difference between the new and the old. So what is the difference between Lowrance HDS Live and HDS Carbon?

Lowrance Elite Ti2 versus Elite FS

  When Lowrance launches a new mid-range unit, it is a big deal. Forums and Facebookgroups light up with questions on the new stuff, differences towards the old stuff and questions on compatibility. As usual, we in Team Colibri will try our best to sort that out, both on a technical level and with a more practical in-your-boat approach.

Lowrance Hook 2 versus Lowrance Hook Reveal

You have to hand it to Lowrance when it comes to the name of their new entry-level line of sonar and chartplotters. We all want to hook up, and what better way to do that then by having our marine electronics reveal to us where the fish are?

What is the difference between Lowrance HDS Live and Elite Ti2?

Lowrance as a brand of marine electronis is well known to all anglers, but the differences within their range of different models seem to cause quite a few questions out there. Here we will try to outline the difference between Lowrance HDS Live (top end) and Lowrance Elite Ti2 (middle range). Lowrance Elite Ti2 vs Lowrance HDS Live (photo; lowrance.com) As usual, we will start with the tech and then try to translate those technical aspects to practical differences while out on the water. Hardware - housing, screen and connections. The screen and housing on Elite Ti2 is the same as on the previous Elite Ti, and again more or less the same as on HDS Gen 2 Touch. (The memorycard-door and mounting-bracket is different from HDS Gen 2 Touch.) This is by no means new stuff, and compared to the more advanced housing and screen on HDS Live, Elite Ti2 is starting to show its relative age. However, with that in mind it is worth noting that when looking at the competition, several of ...