Denne artkelen finnes på
norsk HER.
Open Street Map (OSM) is as close to "revenge of the nerds" as you will get with maps and chartplotters. In this article we will take a look at how you can use Open Street Map as background on your Lowrance, Simrad or B&G chartplotter, and it`s all for free!
 |
| Depths from Reefmaster, background from Open Street Map and on top Genesis Live. |
I`m offcourse a huge fan of OSM, although it is mainly for use on land, not in your boat. But it can still be useful in your boat, as a background used with other maps with depth-contours, if you mainly rely on Genesis Live or on its own when boating in areas where no contour-mapping is available. But just to be clear, these maps DO NOT have any information of depths, no contours and no point-depths. But that does not mean that they can not be used as a suplement to such maps, more on that later on in the article.
Start by downloading OSM-files for your area to your computer. You will find the neccessary osm.pbf-files needed here:
http://download.geofabrik.de/index.html
That brings you to this:
 |
| Choose your part of the world |
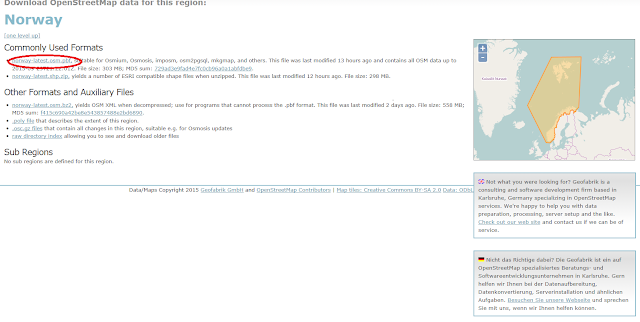
In the red box, choose your part of the world. Then click on the country you want, and in some cases the region/ state has to be choosen as well. In my case i use "Norway", leading me to this:
 |
| Choose the right filetype |
In the red circle on the picture above, you can see the file you need to download:
your region-latest.osm.pbf. Download this file, and save it to a folder on your PC. Name the folder something useful, in my case "OSM Norge". The file is quite big, so the download may take a while if you are on a slow internettconnection.
Then you start Insight Map Creator (IMC.) IMC can be dowloaded for free from Navicos online store:
http://www.gofreemarine.com/developers/insight-map-creator. You have to register an account in order to download, and after ordering IMC you will get an email with a link to the actual download. (That email can be a litle cryptic, but read it carefully and you will see the link.)
Start IMC and run it in "Vector Mode". You change mode by clicking "View", see the red circle on this screenshot:
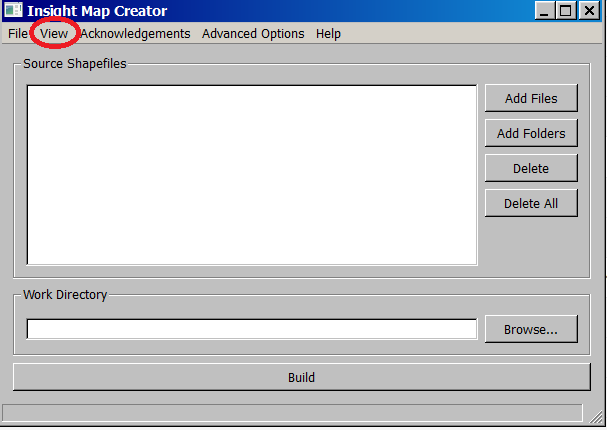 |
| Enter the "View"-menu in IMC |
After clicking on "View", go to "Processing Modes", and then "Vector Mode Window" like in this screenshot:
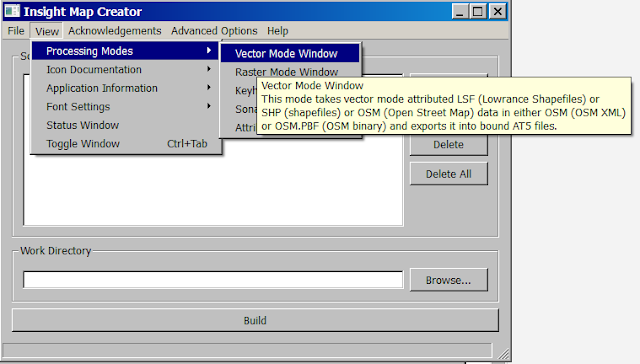 |
| "Vector Mode Window" in IMC |
So far it has been pretty straight forward, and we have done nothing that one would not normally do when converting files to the AT5-format our units from Lowrance and Simrad uses. But from now on this will change a litle, so stay awake now. :)
Click on "Advanced Options" and mark "Project Based Naming". See the red circle in the screenshot below for where you need to put a mark:
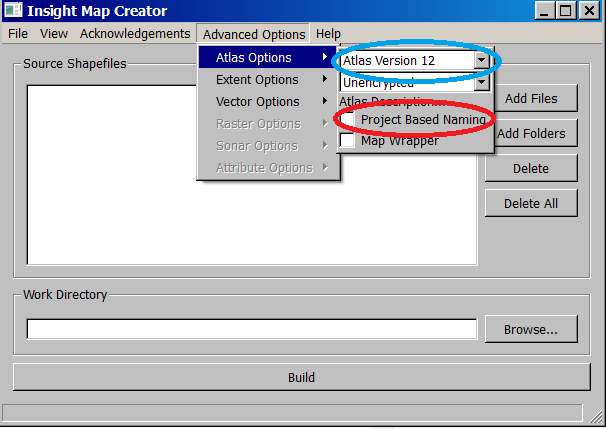 |
| "Project Based Naming" in IMC |
Before we take the next step, we will look briefly into "Atlas Version" (Blue circle in the screenshot above). I will not bore you with minor details, just notice that a high Atlas is not compatible with older units. Some features, like depth-highlight and other advanced features are only possible with Atlas 12 or higher.
For the sort of map we are building now, we don`t need a high Atlas, so version 7 will do. You can use mapfiles with different Atlas-versions togetther, so you can still use Atlas 7 now and combine these files with files from
Reefmaster with a higher Atlas.
The next step is to set up the IMC so it can find the file you downloaded from OSM before. In the "Source Shapefiles"-part click on "Add Folders" (
Do not use "Add Files"), marked with a red circle in the screenshot below. This opens a new window, where you need to input the path to the file you saved. (Blue arrow in the screenshot below.)
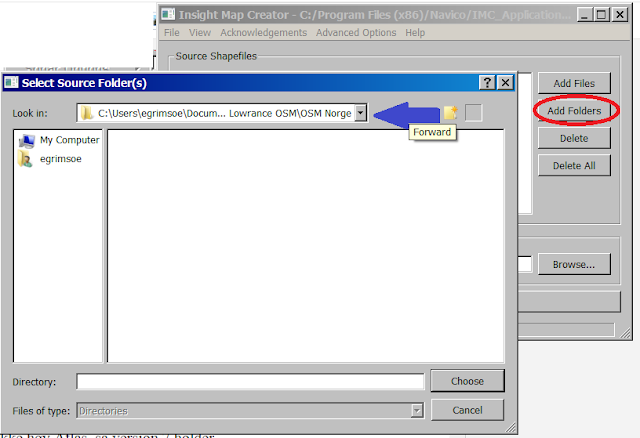 |
| Add input-directory in IMC |
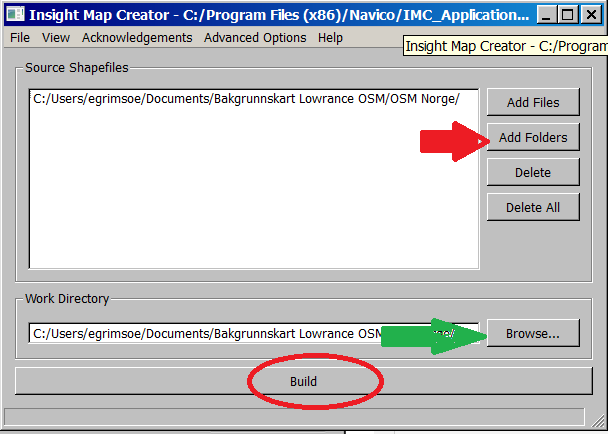
When that is done, IMC knows where to find your file. Now we need to tell it where to put the finished files. In the "Work Directory"-part you click on "Browse..." and choose a folder for the finished AT5-files. This folder should be empty, IMC tends to overwrite other files in the folder. Choose a sensible name for your folder, in my case "AT5 Norge". The name of this folder will also be the name of the finished files. (See green arrow on the screenshot below.)
 |
| Add output-directory in IMC |
You are now ready to run IMC, which will use your osm.pbf-files and convert them to AT5-files that you can use in your chartplotter. In the screenshot below I summarize what we just did:
- Red arrow to choose the folder with your OSM-files
- Green arrow to choose the folder your AT5-files will end up in
- Red circle when you are ready to run the IMC
 |
| Build in IMC |
After you click on "Build" it is time to go an get yourself a cup of patience. This will take some time, depending on how fast your PC is and how large the original OSM-files where. If the process ends within seconds, you have done something wrong, my PC uses a good 30-40 minuttes to complete the process. When the IMC is done, you will see the message "Process Complete!" at the bottom, like in the screenshot below:
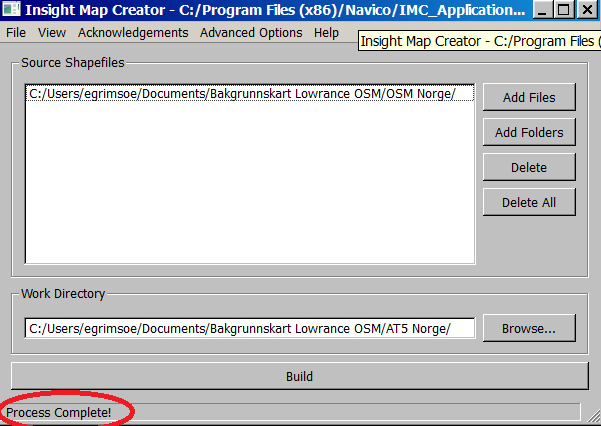 |
| Process Complete! in IMC |
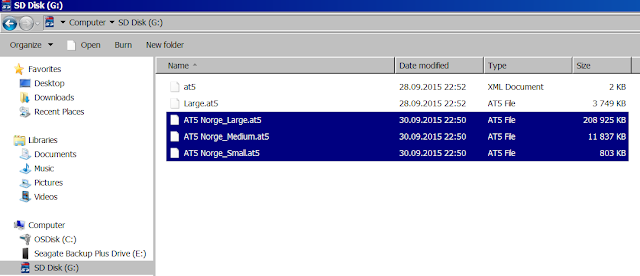
In the folder you designated for the finished AT5-files it should now look like this:
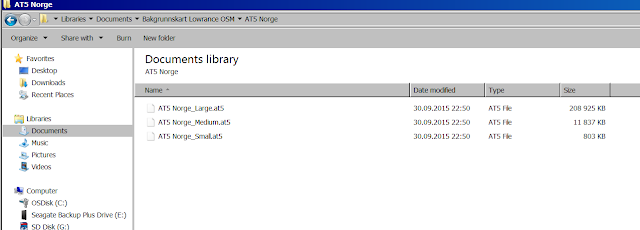 |
| All done |
Note that the files has been named after the folder. This makes it easier to rememeber which files are what on a memorycard, where you use just the AT5-files and not the whole folder. You can now copy these files on to a memorycard and use your map in your Lowrance or Simrad chartplotter.
Here is huge tip.
As I have mentioned, these mapfiles are just a background, but they can be used toghetter with other maps in a vector format. Just add these files on the same memorycard as you have your Reefmaster-files, and your chartplotter will read all files as one map:
 |
| Both AT5-files from OSM and Reefmaster |
On my Lowrance HDS Thouch this looks like this, when combined with files from Reefmaster. I get both a great contour-map, and a background with roads, forest/ housing etc:
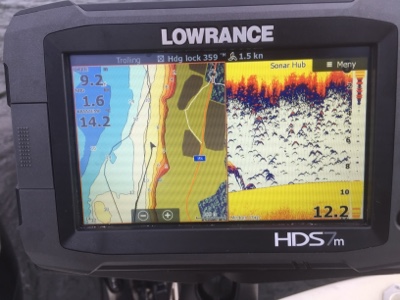 |
| Both deptcontours and a nice background |
In theory this should work with files from
Insight Genesis as well. For some reason I have not been able to make it work on my HDS-units, but on my Lowrance Elites and Lowrance Mark it works like a charm. The screenshots below is from my Lowrance Elite 4 HDI, using a free map from Insight Genesis (Social Map) and the OSM-background.
 |
| Zoomed far out |
 |
| Zooming in a litle |
 |
| Keep on zooming |
 |
| Getting there |
 |
| Almost there |
 |
| Ready to go fishing |
The small print.
"You are free to copy, distribute, transmit and adapt our data, as long as you credit OpenStreetMap and its contributors. If you alter or build upon our data, you may distribute the result only under the same licence. The full legal code explains your rights and responsibilities." This is what I`m doing here. If you want to repeat what I have done, remember to credit OSM for the data you use. The full legal print can be found here:
https://www.openstreetmap.org/copyright/en


Kommentarer
Legg inn en kommentar