Blogg om det som fenger oss, sportsfiske, båtelektronikk, småbåter og andre artige ting som måtte dukke opp.
Søk i denne bloggen
The perfect settings for Lowrance? A guide on how to set up your 2D-sonar part I.
Perhaps the most repeated question in Facebookgroups and forums regarding marine electronics: "What are the best settings?" The bad news is that there is no uniform answer to that. The good news is that you can adjust settings according to conditions if you have a little knowledge as to what settings you should tweak and why. Here is part 1 of our guide to get the most out of your unit in regards to settings.
In the (coming) three articles we`ll list all the settings as they appear on Lowrance HDS Live and Elite FS for 2D-sonar, tell you what each setting does and give some advice on how to adjust it according to conditions. The exact location of these settings in the menu will vary slightly if your unit is older, but they will still be there on all generations HDS as well as on Elite Ti/ Ti2. On the low-end units like Hook2 and Hook Reveal some settings might not be there, and you will have to activate the "Advanced" options to see any of the more advanced settings in your regular menu.
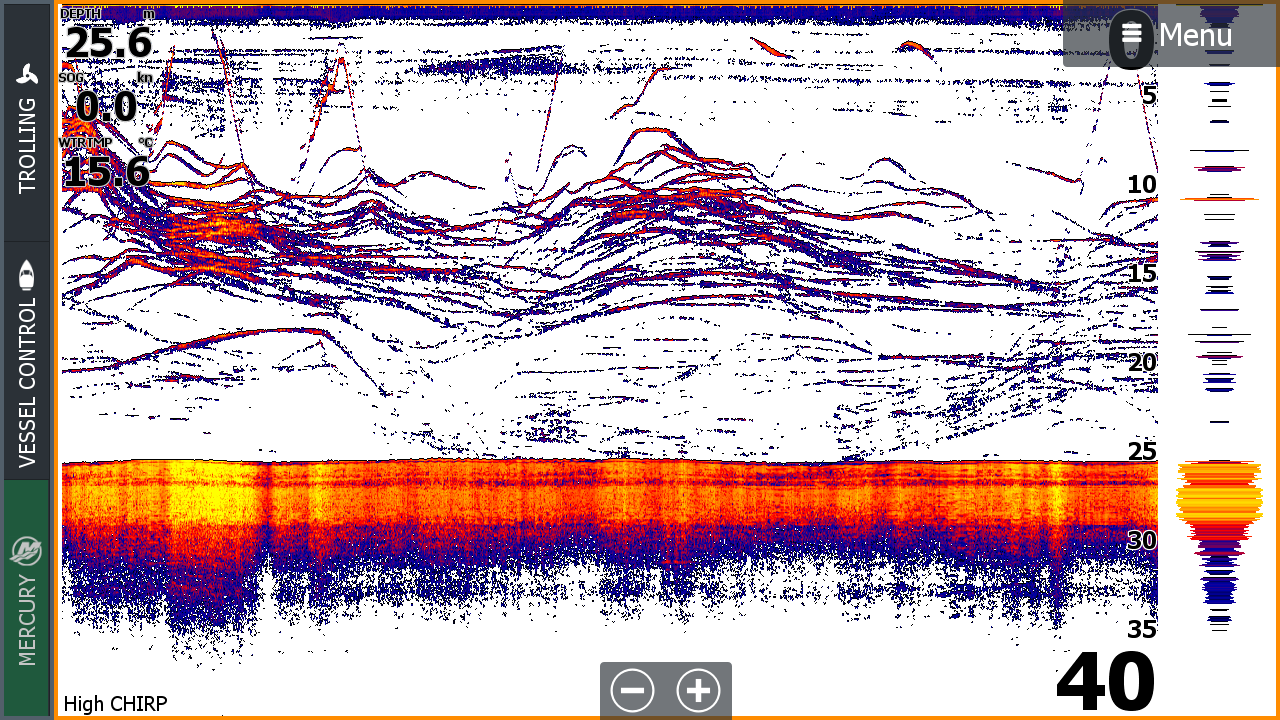
Well adjusted 2D-sonar can indeed paint a pretty picture - and help you find the fish.
First things first. Before we dive into the details, please be advised that specific settings is a combination of three things.
The equipment used (especially which transducers).
How the equipment has been mounted.
Local conditions.
Proper mounting and angle is key regardless what model transducer you have.
If your transducer is not properly mounted, or you unit is getting low voltage, there are no settings in the world to help you fix the potential issues followed by that. Incorrect mounting or adjusting of the transducer, and incorrect wiring of your unit, will cause issues and you need to fix the "root cause" before adjusting anything. This is how you can check if your unit suffers from low voltage:
If you find that your unit has low voltage, I suggest reading THIS article and get the issue fixed as soon as possible. Low voltage is "the mother of all evil" when it comes to marine electronics, and can cause all sorts of issues.
Having your transducer level (towards the surface, not towards your hull) is extremely important for SideScan and DownScan, but it is also important for 2D when it comes to getting those perfect arches. This is how you can check if your transducer needs to be leveled, simply by looking at the arches on your 2D-sonar:
Transducer angle and arches (photo; lowrance.com)
OK, so now you have your transducer mounted and angled the way it should, and your unit has good voltage. The next thing to do is checking that your unit knows which transducer you are using. All transducers have a label, usually quite close to the connector on the transducer-cable, which tells you what transducer you have. Don`t assume that the shop has sold you what you think, or that the previous owner of your boat did this right - check that label.
SKU on top and name at the bottom
The SKU circled in the top half of the photo above, is the part-number used by Lowrance. In my example you see the SKU is 003-6387-00, and a quick Google-search brings up HST-WSBL in the top ten hits, just in case the name on the label is in a state where you can not read it. In my example both sides of the label is readable, and naturally the name HST-WSBL is on the other side.
With that information at hand, the next step is to press Pages-Settings-Sonar-Installation. This brings you to the installation-menu for 2D-sonar, and as you can see, I have chosen HST-WSBL as transducer on my Elite FS in this case. Make sure to hit "Save" after choosing correct transducer.
Make sure correct transducer has been choosen.
If you find that the box where you choose transducer is grayed out, and does not respond to your touch, don`t worry. Many transducers today uses something called XID. XID is a chip in the transducer that tells your sonar what transducer you have connected, and what you see in the greyed out box will be more or less the same as you see on the label on the transducer-cable.
XID has already done its job (Norwegian menu in this screenshot).
Now that we have the basics covered, it is time to press Pages again, and open our 2D-view (2D = the "normal" sonar"). On the top right you see "Menu", hit that to open the side-bar which contains the menus we will be looking at from here on:
Tap on this to open the side-bar menu. (Norwegian menu in this screenshot)
Opening the bar gives you these options:
Menu-options for 2D-sonar.
We will go through them one by one over a series of three articles, explaining what they do both technically and what that means while out there fishing. Several of these have sub-menus with additional options, but don`t worry, we will cover them all. You might want to fill up your coffee-cup now, there is quite a lot for us to cover.
Mode
Setting Mode, some times called Fishing mode, gives your unit a rough idea of what it will be used for. On earlier units from Lowrance, this mostly made some pre-settings on palette, scrollspeed and so on. But in later units it is also notably changing the way your sonar processes the sonar-signals, it changes the way the algorithms in your unit works.
Lowrance Fishing modes.
Lowrance is not very informative on EXACTLY what happens with the algorithms in the unit on each mode, but they do have a rough guide for which mode to choose:
Lowrance fishing-mode (photo; lowrance.com)
The signal sent by the transducer is called a "ping". It seems that Fishing-mode now also affects the ping itself, adjusting the length of the ping (thus the power used) and the pre-defined algorithm the sonar uses when it searches for bottom lock and processes the return signal (echo). This means that if you use "Shallow Water" in 40 meters (120 feet) of water, your unit will simply not lock on to bottom. The other way around, if you use "Deep Water" in 10 meters (30 feet) of water, the resolution is reduced versus "Shallow Water" since the unit increases the pulse-length of each pulse.
The screenshot above pretty much explains which mode to use when. For the typical user we are left with three of the Fishing mode settings.
General use - if you don`t want to change mode often (by far my most used mode personally).
Shallow water - when fishing in less than 60 feet/ 20 meters.
Deep Water - when venturing way out there and you want solid bottom-lock.
Almost all the following screenshots have been taken in General mode. We have high mountains here in Norway, and it is just as steep under water.
Those mountain-sides continue under water as well.
In such conditions where depth changes frequently, General mode is a good setting.
From shallow to deep and back again? Use General mode.
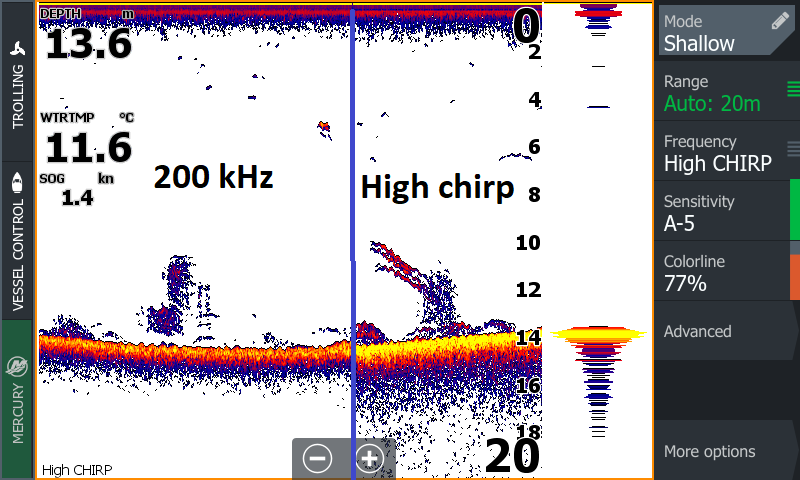
Range
It might seem strange that this menu-point is called "Range" and not "Depth", but it is the correct term. Sonar per definition does not measure depth, it measures range (distance). Your sonar notes how long it takes for the signal to return, and knowing the speed of sound through water it can determine the range from the transducer to the object/ fish/ bottom. This is a rather important thing to keep in mind, especially when looking at 2D with its cone-shaped signal. Let me show you a screenshot as an example:
Big fish on 2D
In this screenshot you see the bottom, above it a lot of plankton, a few baitfish spread out and one big echo (with a red circle around it). At first glance you would assume that the big fish is 3 meters down, would you not?
In reality, that fish was three meters away from the transducer, not necessarily three meters down. Take a look at this drawing to see what I mean:
Depth versus range.
A fish at given depth, will have different range from the transducer, depending on where in the cone it is from a horizontal viewpoint. The wider the cone(-angle) is, the larger the difference between what we think as "depth" might be versus the actual "range" or distance between the transducer and the fish. This is why, when fishing vertically, you should NEVER drop your lure down to the exact same "depth" as the fish you see on your sonar, but stop the lure above it. That way you are sure that your lure does not drop down deeper than the fish is, ensuring that the fish can see your lure. (Most predatory fish see upwards well, while they don`t see down very well.) This is also the reason why I personally don`t like 2D-transducers with extremely wide coneangles, regardless of depth. Having a huge coneangle can simply fool you.
OK, enough with the theory. What does the Range-setting do? If you click on it, you get these option:
Range-options
At the top you see "Auto: xxm" (m as in meters as I use the metric system). A bit down you see "Auto" again, and in this case it has a little green tab in the bottom corner. When that tab is there, you unit will automatically adjust the range in your 2D-view according to depth. Or, as we just saw - not really depth but the distance from the transducer to bottom. But to keep it simple we will refer to it as depth. This means that the power used, will vary automatically. Increasing when it gets deeper, decreasing in shallow water, in order for the unit to have good bottom-lock. For most users, this is how you want to keep it (in Auto), and let the unit control this automatically for you. You can still adjust sensitivity, but the pulse-length and depth used by the unit is controlled automatically.
But there are occasions where you want to override the auto-function. I`ll mention the three most common occasions here.
When looking for specific bottom composition, typically looking for hard bottom in areas with mostly soft bottom. The best way to tell the hardness of the bottom, is to increase the range to around 3 or 4 times actual depth, and look for the double and triple bottom. In some cases you can see four and five as well, if the bottom is rock hard. Soft bottom will not give you an image like this:
Hard bottom
When looking for bottom composition, make sure to use fixed frequency and the frequency that provides the most narrow coneangle (typically 200 kHz with a Lowrance transducer).
When looking for pelagic targets (fish) over deep water. Typically something you do when trolling or fishing vertically. In this screenshot I`m trolling and the depth is close to 100 meters (300 feet). Note all the (bait-)fish you see.
Trolling over deep water.
Even with the depth-range on automatic like in the screenshot above, there is no doubt what so ever that I`m in an area with a lot of fish. But with a little tweaking of my settings, I can get a much better view. If I set the depth-range to the range in which I`m most interested in, AND enable manual mode (Menu-Advanced-Manual mode) the unit will limit the pulse-length of each ping (the power in each ping) to the range I set as well as only showing me what is within the range I set.
Drastic increase in resolution
The result is a drastic increase in resolution. The shorter pulse-length gives better resolution in the sonar-signal itself and the range set gives me more screen-relestate (and pixels) for the stuff I really want to look at. If we compare the two side by side, you can see the difference.
Auto on the left - manual mode on the right.
When the automatic functionality fails. This will typically happen when in very deep water if you are not using a transducer (or unit) suited for such depths, or in very shallow water. In such conditions the algorithms simply fail. The unit does not "understand" what the actual depth is. It might go into a cycle where it constantly changes power in the signal in order to establish bottom lock, or show a thermocline or large school of baitfish as bottom. In such cases, manual mode and depth set to what you know the actual depth is (or slightly more) will usually fix the problem.
In the screenshot below I`m testing a Lowrance Hook2 (7) with its stock SplitShot transducer. As you can see to the left the units algorithms are way off, thinking it is in 1,8 feet of water when it is in 500 feet. But I could still get the unit to draw a (faint) bottom line by using manual mode.
Hook2 with SplitShot-transducer in manual mode.
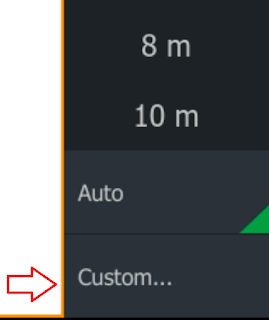
Our last menu-alternative in the Range-menu is "Custom...".
Menu-Range-Custom...
This allows you to control the upper and lower limit of the range. Please keep in mind that this functionality is independent of the "Auto"-setting described above, and can be used both in Auto and in Manual mode.
Setting a custom range
Limiting the lower range gives you the same functionality as setting a maximum range, but in this setting you can set the upper limit as well. As an example, this can be handy when fishing for pelagic species. Let us say you know your are trolling over a total depth of 100 meters, but you know that your target-fish is only in the 10 to 30 meter range. Then setting upper limit to 10 and lower to 30 gives you better practical resolution since you no longer display the parts of the watercoloumn (0-9 meters and 31 to 100 meters) you have no need to see. Think of it as using zoom when looking at a photo on your PC or smartphone, you zoom in on what you want in the photo and exclude the stuff around that. (But the resolution in the photo remains unchanged.)
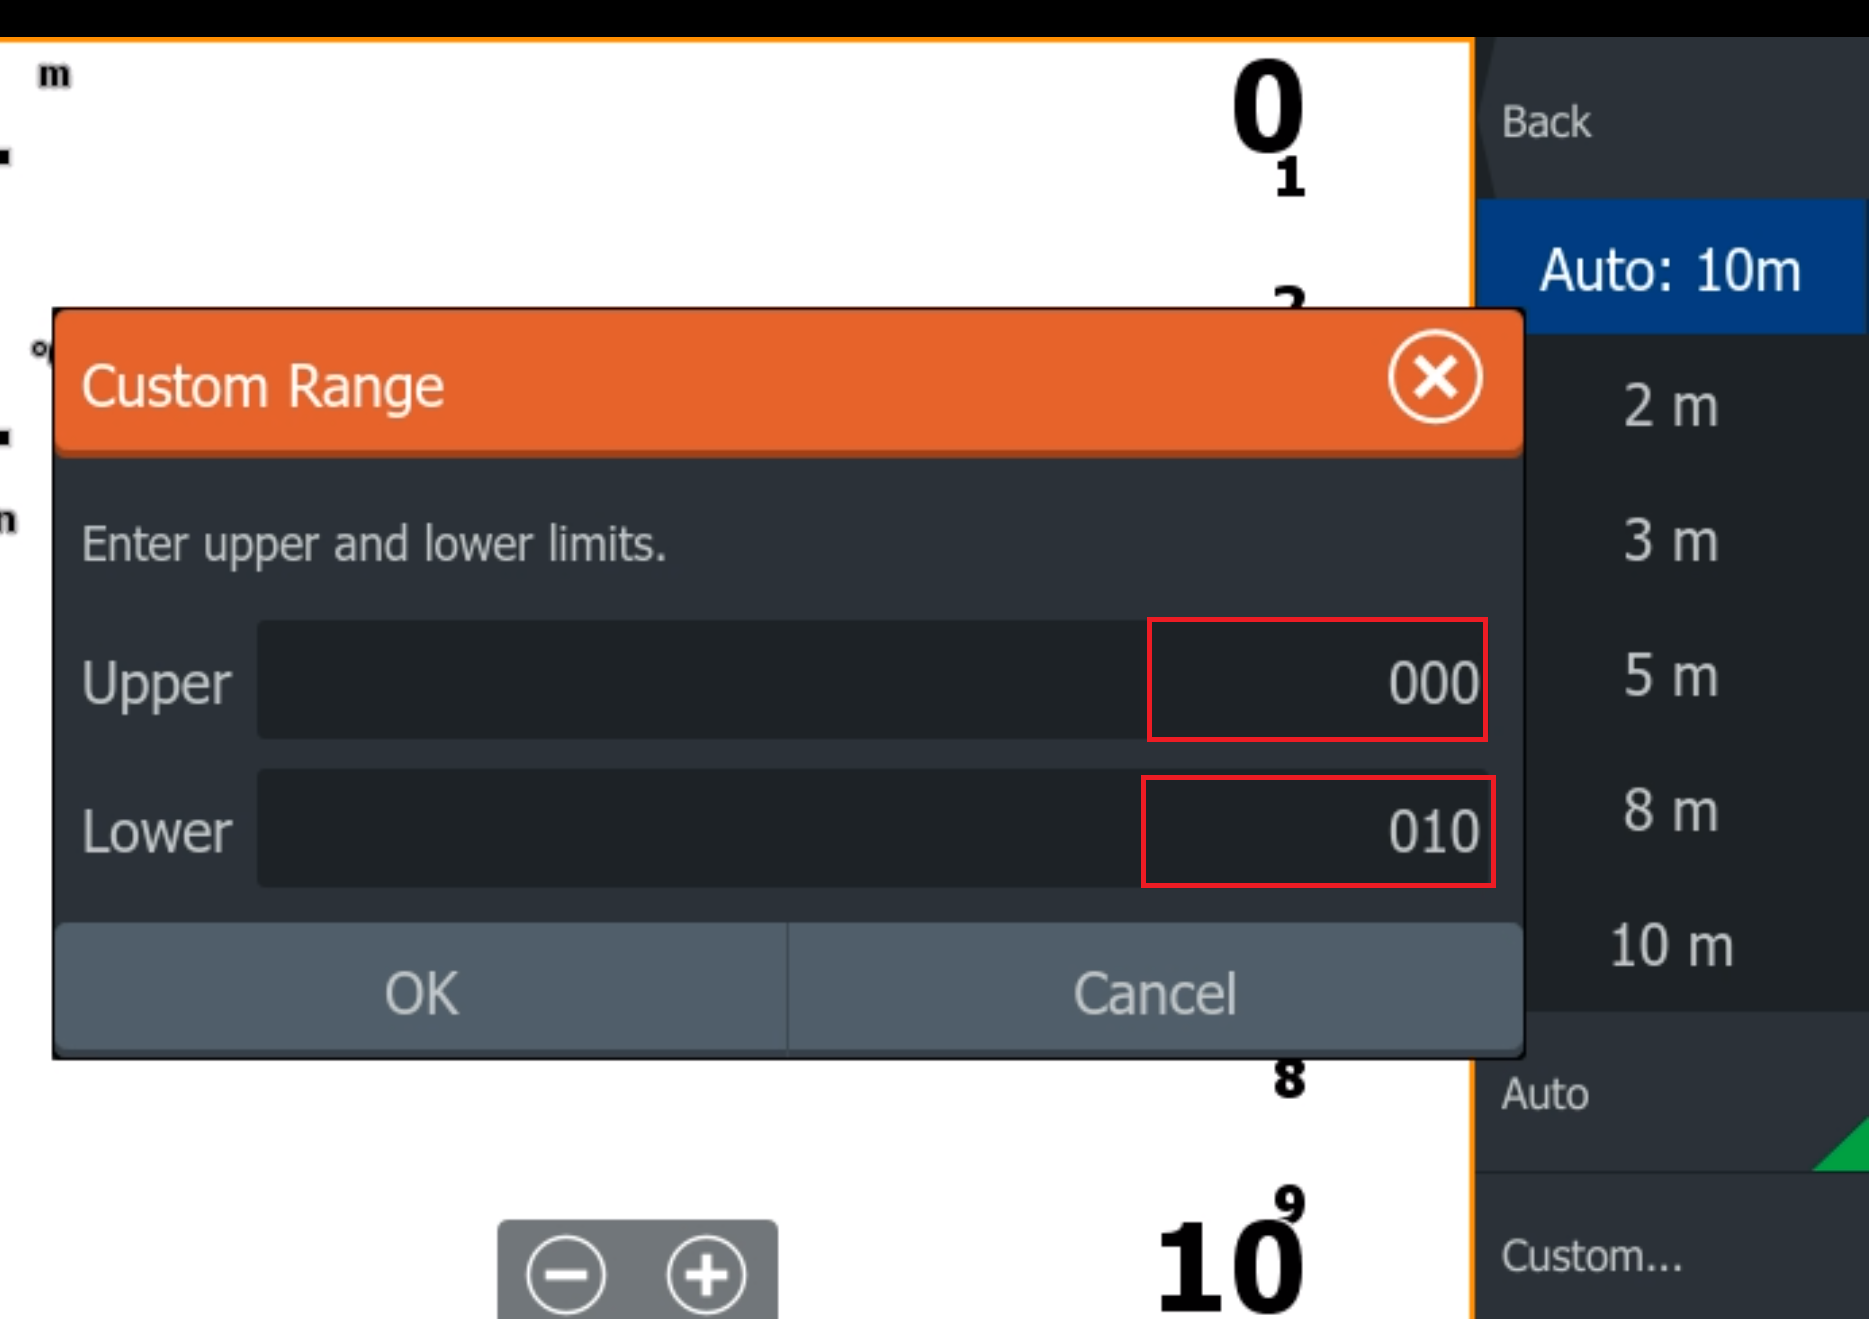
Frequency
For this menu-point it is important that you did your homework mentioned at the beginning, so your unit knows which transducer you are using. If it does, your options in this menu-point will be limited to the frequencies your transducer (and unit) is capable of handling. As an example, if you have an HST-WSBL connected, the basic 83/200-transducer from Lowrance, you will naturally not be able to choose low chirp or 50 kHz in this menu, since those options are not supported by the HST-WSBL transducer.
If you are using a Lowrance-transducer, and have chosen the correct transducer (Pages-Settings-Sonar-Installation), or it has been identified automatically with XID like described at the start of this article, the frequency-options will be one of the below:
Options with transducers based on 83/200.
Options with transducers based on 50/200.
The first shows the alternatives you will have with popular transducers based on 83/200, examples are HST-WSBL, 83/200-HDI, m/h TotalScan and Active Imaging 3 in 1. The second shows you the options you have with transducers based on 50/200, like HST-DFSBL, 50/200-HDI or the through-hull transducer l/h TotalScan. Again, knowing which transducer you have, and ensuring your sonar knows it to, is the key for having options under Frequency that are actually supported by your transducer.
If you are using one of Airmars chirp-ready transducers like TM150M, TM165HW, TM185HW etc, your choice of frequency will have one more option, "Custom..."
Menu - Frequency with Airmar chirp ready transducer.
You can set a single frequency within the transducers range.
The custom-setting is only available when using Airmars chirp-ready transducers. It allows you to pick and use a single frequency within the chirp-band the transducer supports. As an example. my own Airmar TM185HW uses high chirp from 150 kHz to 250 kHz. With this setting I can choose to use any single frequency within that range, for instance 170, 220 or 250 kHz.
Sonar uses sound-waves. Sound can be measured in several ways, and one of them is frequency. As a rule of thumb, the higher the frequency the better the resolution, the lower the frequency, the more power the signal will have.
One of the reasons resolution changes with frequency is related to the resolution in the acoustic wave itself, but a big part of how it looks on your unit, is that coneangle changes with frequency. When using a single-element transducer (like any of the Lowrance-transducers plus popular Airmar-transducers like TM165HW, TM150M and P66), the coneangle increases when using a lower frequency, and decreases when using a higher frequency. Here are a few examples. Transducer model - frequency - coneangle:
HST-WSBL - 83/200 - 60/20
HST-DFSBL - 50/200 - 35/12
83/200-HDI, TotalScan and AI 3 in 1 - 83/200 - 52/21
P66 - 50/200 - 45/11
For Airmars most popular chirp-transducers the frequency-range and coneangles are:
Airmar overview.
Lower frequency (and thus wider coneangle) averages out what is inside the cone. Why is coneangle so important? Take a look at this screenshot:
Wreck shown with narrow coneangle to the left
The screenshot is a few years old, and from an article I wrote on wreck-hunting (found HERE). Depth is in meters, so the wreck you see rising from the bottom on the left half of the screenshot sits at around 42 feet. Transducer used was Airmar P66, to the left is 200 kHz with a narrow coneangle of 11 degrees, to the right is 50 kHz with a whopping coneangle of 45 degrees. This screenshot clearly shows you how a narrow versus wide coneangle affects how your sonar reads and draws the bottom line. With 200 kHz the wreck clearly rizes from the bottom, while the wide coneangle of the 50 kHz makes it disappear in the bottom line. On 50 kHz we can only see a faint hint of the wreck since the bottom line thickens slightly where the wreck is, due to the wrecks harder return of the acoustic signal then the surrounding (softer) bottom. The wreck looks like this with DownScan:
The same wreck with DownScan.
The wreck shown is an old shrimp-trawler, when in operations it was 20 meters (60 feet) long. That leads me to a question: When the large coneangle can make a whole ship "disappear" into the bottom-line, do you think you would see any fish close to bottom with the same coneangle?
A large coneangle is good for showing fish in the watercoloumn, but it is useless when looking for fish close to bottom, structure or (as you just saw) wrecks. Likewise, using a narrow coneangle might make you miss the fish of your dreams since the fish never gets close enough to enter the narrow cone. Since you can not "tune" coneangle in the settings, you effectively choose coneangle by selecting frequency.
When looking for pelagic fish in 0-150 meters of water, I personally prefer a coneangle around 20-25 degrees, which with transducers like HST-WSBL, 83/200-HDI, TotalScan, Active Imaging 3 in 1 and Airmar TM185HW means 200 kHz or high chirp as frequency. Personally I don`t see a need for a wider coneangle regardless of fishing-style, simply because I can use SideScan if I need to see a larger area around my boat.
When looking for fish close to bottom in 0-100 meters of water, I personally prefer a coneangle around 10-12 degrees, which with transducers like HST-DFSBL, 50/200-HDI, l/H TotalScan and Airmar B175H means 200 kHz. I don`t use chirp when looking for fish close to bottom, the reason why is explained further down in this article.
When looking for fish close to bottom in 100+ meters of water, I personally prefer a coneangle less than 10 degrees, which means leaving the Lowrance transducers behind and looking towards Airmar. Transducers like B260, TM260, TM265LH, B175H and B265LH in 200 kHz as long as 200 reads well at that depth with the conditions that day.
Chirp or not chirp? Chirp means that the sonar sends a sweep, not just a single frequency. As an example, HST-WSBL can use 83 and 200 as fixed frequency, and chirp in medium (60-100 kHz) and high (160-240 kHz) chirp. The theory behind chirp is that chirp increases resolution since the resolution when using chirp comes from the bandwidth (the difference between the lowest and highest frequency in the chirp-sweep) in the sweep and not pulse-length. The downside of a (fixed) high frequency in sonar has always been that the energy in a higher frequency sound-wave is lower than the equivalent sound-wave using lower frequency. In order to increase the energy in the sound-wave, one has to lengthen the pulse. But increasing pulse-length will again cause a drop in resolution. Chirp was originally designed for radar, and as you probably know radar is basically sonar transmitting in air instead of water.
Since resolution with chirp comes from the sweep, and not pulse-length, you can in theory increase the pulse-length (thus getting a stronger signal) without sacrificing resolution. And voila, you can use high frequencies in deep water, or in harsh conditions like on plane where turbulence from the hull will cause issues for the "weak" fixed high frequency.
Unfortunately having a sweep of frequencies also means that the sonar needs to have a lot more processing power (and way more sophisticated algorithms) in order to "interpret" the echo from the sweep. Our recreational sonars have come a long way over the last decade or so, but they are still lacking when it comes to fully utilizing the potential behind the theory of chirp sonar. In a more practical term, this means that there are still times where you want to use fixed frequency. Examples of such times are typically when looking for structure or bottom-composition, where our sonars simply gets a bit confused by all the information in the chirp-echo and end up showing unclear structure or missing what parts of the bottom are hard versus soft. But when it comes to showing fish, chirp is typically the way to go.
Chirp gives the illusion that the bottom is harder than 200 kHz.
As a side note, you can use two different frequencies at once with all Lowrance-transducers and with a few Airmar-transducers. In order to do this, create a custom-view (from the Pages-panel as described in your manual) with two 2D-windows. Select the same transducer in both, but different frequencies like 200 and 50 kHz. This will effectively give you half the pingspeed on several units, but it enables you to view two different frequencies. (More on pingspeed in our next article). For a beginner, I recommend using such a splitscreen-view until you feel comfortable with your two options.
Sensitivity
I don`t like the word sensitivity used to describe a setting, but I see why Lowrance uses that word and not "Filtering" or "Echo enhancement" as sensitivity is probably easier for the average user to understand.
Setting Sensitivity in Auto
With the unit in Auto-mode, sensitivity is automatically adjusted according to depth. But you can still adjust how high or low you want the automatic adjustment to be. If the unit is in manual-mode, the sensitivity will not adjust according to depth, and your setting overrides the algorithms that otherwise adjust sensitivity.
Setting Sensitivity manual
Regardless if you prefer auto or manual, sensitivity has to be adjusted according to conditions and what you are looking for, as well as personal preference. Personally I generally run my sensitivity lower than most, the exception is if I`m looking for the thermocline. On a general basis I have no need to see single baitfish, and lowering sensitivity means less clutter while I still see schools of baitfish and larger (predatory) fish. What is important though, especially for a beginner, is that you spend some time getting used to what different sizes of fish will look like depending on sensitivity. Increasing sensitivity (especially when using a transducer with a very large coneangle like Bullet, Splitshot or Tripleshot) might have you thinking that more or less every fish you pass over is big - and trust me when I say they are not...
Here are a few examples of what changing sensitivity will do. All these screenshots are taken at the same day and location, you can see the sensitivity-setting on the right.
Auto.
With default sensitivity (and all filtering off) we get quite a bit of clutter in the top third of the watercoloumn. These screenshots are from a fjord, where the top of the watercoloumn has a lot of freshwater in it causing horizontal lines on the sonar (basically many thin layers of water with different salinity and temperature). This clutter is helpful in such conditions when fishing for species of fish that like more (or less) salinity as it tells you how deep you need to fish in order to target specific species of fish. But once I know the layering is there I will typically reduce sensitivity to have less clutter in the image.
If we increase sensitivity under such conditions, the image gets harder to interpret. The layering in the top third (or so) of the watercoloumn could be mistaken for baitfish with higher sensitivity like in this example:
Auto plus 6
Then we go the other way, we reduce sensitivity. Notice how the layers towards the surface change, how the fish change and how the color of the bottom changes as sensitivity is reduced.
Auto minus 4
If we continue to decrease sensitivity, the color seen in the bottom-line starts to change from the bright yellow (indicating hard rocky bottom with this palette) into color that could lead us to think the bottom is less hard, like sand.
Auto minus 9
By dropping it even more, only the largest fish in the school, and those directly under the transducer, are visible. Now the color of the bottom line has also changed to the softer red with even softer blue under. If we did not know that sensitivity was very low in the screenshot below, we could easily be misled to think we where looking at sparse baitfish over soft bottom in this screenshot:
Auto minus 14
This is what you are looking at in the screenshots above.
Whiting - Merlangius merlangus
It is very hard to give general recommendations on sensitivity. My best tip is to adjust it against something you know. Depending on sonar, transducer and depth I fish in, I will use anything from auto plus two and down to auto minus 9. The better the transducer you use is, the lower sensitivity you need to see the fish you want to see, but even with the cheapest Lowrance-transducer (HST-WSBL) I`m usually on the minus-side of auto. For shallow water (less than 20 meters/ 60 feet) I`m never on the plus-side of auto regardless of transducer. There are a lot of anglers out there that disagree with me on this, and prefer their sensitivity a fair bit higher than what I prefer. But especially for a beginner, a sonar newbie, I highly recommend to keep sensitivity a couple of steps below auto as this will leave you with an image where small fish look like small fish and big fish look like big fish.
As you just saw in the screenshots above, sensitivity and color are interlinked. Increasing color, can give a similar effect on the image you see, as increasing sensitivity. This leads us to our next menu-point, colorline.
Colorline
This setting adjust how much color is used to show you any given echo (fish, bottom, structure etc). The point is to make it possible to differentiate echos based on their hardness, like separating a fish close to bottom from the bottom line itself. As for sensitivity when in auto-mode, this setting does not change the acoustic signal itself, it only changes how the echo looks on your screen.
Colorline changes how much color is applied in the image, which again changes how "hard" any given echo (fish, bottom) is shown on your screen. On older units this setting was called greyline, which did the same only that since the old units had black and white screens, you adjusted how much black was used for any given echo.
Adjusting colorline.
Having just enough color makes it easier to determine bottom-composition and see fish close to bottom, as well as making the guesswork all anglers do when it comes to trying to estimate fish size from sonar-images easier. Especially the lather takes A LOT of practice, but if your colorline is off it is close to impossible anyway.
I typically run colorline around 72-78% on my Lowrance units. Here are two examples from the same spot and time, one with to little colorline and one with just enough:
To little color - even rock hard bottom reflects as soft and the fish are barely visible.
Compare the screenshot above with the one below. Same spot but the one below is taken a second or two later so the school of fish we are approaching are showing slightly more in the sonar-history. The effect of to little color in the screenshot above is still clear though. Compare the echo draw of the school of fish, the bottom line and the single fish just above bottom. The fish just above bottom is on the outskirts of the coneangle and giving a faint echo even with enough color, but it is almost impossible to see with to little color.
Perfect - bottom composition shows well and so does the fish.
The school of fish seen in the two screenshots above where coalfish, Pollachius virens of decent size.
Coalfish.
Advanced and More options
In our next article in this series we will look at the options under "Advanced", and in the last article we will cover "More options". For now I recommend that you get out there on the water, and play around with the settings we just went through. By the time you feel comfortable with those, we should have part II published. :)
What if you messed up?
Don`t worry. There are three ways to undo everything we have looked at and adjusted while going through the menu(s) in this article. Those three ways are to "Restore Defaults", do a soft reset, and if all else fails, to do a hard reset. Please keep in mind that neither of these options will hurt your unit, and they can all be used at your leisure whenever you find the need to undo what you (or perhaps a buddy fishing from your boat?) did. We can start with the "softest" approach, the Restore Defaults.
Press Pages, then Settings and System. Scroll down a bit and you will see "Restore defaults...."
Press Pages, then Settings-System-Restore defaults...
Hit it and you get a menu where you tick off what you want to reset, the default options are the typical ones when it comes to settings beeing out of order:
Typical settings to reset.
Hit OK, and you can start over from the factory settings, you still have your waypoints, routes and trails available in the unit.
The next method is a soft reset. This basically does the same as the previous option, but since you do this by just using the buttons, it is a handy alternative if (for some reason) you have issues with the touchscreen. Like the hard reset, this is not found in the menu, but requires you to do the following:
turn unit OFF
press and hold the PAGES button
press and release the LIGHT/POWER button
release all buttons when the USA map appears
The last step is a hard reset. The hard reset undoes everything you have done, expect software-updates. It basically resets the unit back to where it was when you bought it brand new, but still with updated software. The steps for a hard reset are:
turn unit OFF
press and hold both the ZIN and ZOUT buttons
press and release the LIGHT/POWER button
release all buttons when the USA map appears
Please ensure that you back up your waypoints (and if you need them, trails or routes) before doing a hard reset, as this reset deletes them all. I highly recommend that you save your waypoints to a memorycard on a regular basis as back-up.
If you had the patience to read this far, you should now have a basic understanding of the first set of 2D-settings. The next thing to do, is to get out there on the water and play with the settings. As I mentioned at the very beginning in this article, one of the things that you use settings to compensate for are local conditions. Since it is impossible to cover all the possible "local condition" you might encounter as an angler in one article like this, you simply have to get out there. But that is why we fish, is it not?
Want more on the topic?
In part II we look at the Advanced settings, click THIS link to read more on those.
Doctor Sonar educational articles As you will see when looking at the screenshots in the link and comparing them to my screenshots, the good Doc and I disagree on how high sensetivity should be. But that is more about personal preference then knowing what you are doing.
YouTube is a good source for information on settings. But it can also be a bit confusing at times, since YouTube has no quality-control. Anyone can make a "settings-explained"-video and post it on YouTube, and in all honesty a few of these are made by people who mean well but lack knowledge. This video is a good example of a person who really knows what he is doing on a Lowrance:
Here we go again, a new generation of the Lowrance HDS. And with that Facebook and the different forums are flooded with questions referring to the difference between the new and the old. So what is the difference between Lowrance HDS Live and HDS Carbon?
When Lowrance launches a new mid-range unit, it is a big deal. Forums and Facebookgroups light up with questions on the new stuff, differences towards the old stuff and questions on compatibility. As usual, we in Team Colibri will try our best to sort that out, both on a technical level and with a more practical in-your-boat approach.
Lowrance as a brand of marine electronis is well known to all anglers, but the differences within their range of different models seem to cause quite a few questions out there. Here we will try to outline the difference between Lowrance HDS Live (top end) and Lowrance Elite Ti2 (middle range). Lowrance Elite Ti2 vs Lowrance HDS Live (photo; lowrance.com) As usual, we will start with the tech and then try to translate those technical aspects to practical differences while out on the water. Hardware - housing, screen and connections. The screen and housing on Elite Ti2 is the same as on the previous Elite Ti, and again more or less the same as on HDS Gen 2 Touch. (The memorycard-door and mounting-bracket is different from HDS Gen 2 Touch.) This is by no means new stuff, and compared to the more advanced housing and screen on HDS Live, Elite Ti2 is starting to show its relative age. However, with that in mind it is worth noting that when looking at the competition, several of
You have to hand it to Lowrance when it comes to the name of their new entry-level line of sonar and chartplotters. We all want to hook up, and what better way to do that then by having our marine electronics reveal to us where the fish are?


Kommentarer
Legg inn en kommentar